Prepare for a new time!
Time… For some reason we tend to stick to an ancient system which has no logic at all. Let’s be honest: if we would invent a new time system nowadays, it would probably not have 7 days in a week, 24 hours in a day and 60 minutes per hour. It would be something decimal, like all other units in the metric system. So it’s about time to get rid of this outdated system and switch over to decimal time, by building your own Decimal Time clock!
A short history of Decimal Time
In 1792 France tried to introduce a new time system, called Decimal Time. It defines that 10 hours make a day, 100 minutes per hour, and 100 seconds per minute. So a decimal time of 1.2345 represents 1 hour, 23 (decimal) minutes and 45 (decimal) seconds. It is as simple as that. A slightly different notation shows a time notation in days: 0.12345d.
In Switzerland they developed an almost identical system in 1998, called Swatch Internet Time. The concept is that a day counts 1000 beats (analog to 1000 decimal minutes in a day in Decimal Time). The notation is slightly different: @123 means 1.23 in Decimal Time. They even came up with centibeats, comparable to the decimal seconds in Decimal Time. Last but not least: they had serious plans to launch a satellite to broadcast time in beats, but this plan was canceled since the planned radio frequency was already in use for amateur radio.
Building a Decimal Time Clock
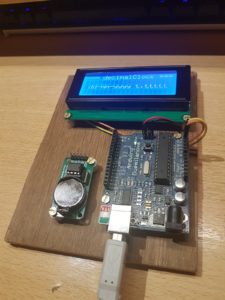
Although all efforts mentioned above didn’t succeed, I still like the idea of Decimal Time, so I decided to build a Decimal Time Clock. Therefore I used the following components:
- Arduino board
- RTC module (RTC = Real Time Clock)
- LCD display
The Arduino is my favorite prototyping board and I’ve used it in many projects/concepts. For this project I used the Arduino Duemilanove, which is very outdated but I still had some left in my junk box.
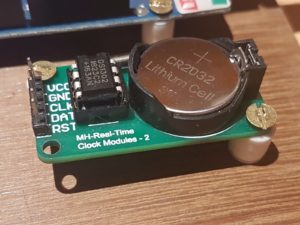
I recently bought an RTC module from my favourite Chinese web shop, since I thought it would be a good idea to have one in stock. This project appeared to be a nice opportunity to give it a try. The module is based on the DS1302 chip, which requires just power (2.0 – 5.5 V DC) and a 32.768 kHz crystal to run. It also supports an external battery (CR2032) to keep the clock running while the power is turned off. The chip provides a 3-wire serial interface, with TTL levels when powered with 5V DC.
To display the time I wanted to play again with an I2C LCD display (actually just a HD44780 display with an I2C PCF8574 ‘piggyback’), since I will need this in a more serious project later this year. I2C is a simple serial bus. The Arduino board provides an I2C interface using pins A4 and A5, which are normally analog inputs, but in most projects you don’t need that many analog inputs. So the good thing is that it doesn’t take any of the sparse digital pins, while the HD44780 interface would take at least 6 of them. The back draw is that I2C is slower than HD44780, but unless you are building a fast responding game, speed is not an issue.
I already have some I2C displays in my junk box, including a nice 20×4 display with white letters on a blue lit background, which is more than big enough for this project. A 16×2 would be sufficient as well.
I screwed down the 3 boards on a piece of plywood of about 10×15 cm. I used 8mm stand-offs to keep the boards on a nice distance from the wood, this also allowed me to guide the wires down the boards. I used jumper wires to connect all boards.
Writing the code
I based my code on the DS1302 example that comes with Makuna’s Rtc library. I got rid of some serial output and added code to send the output to the LCD display. I also had to find a way to calculate Decimal Time from the ‘historical’ time format still used by the RTC board. Since a day counts 86.400 seconds in the ‘deprecated’ format, and 100.000 in the Digital Time format, the formula would be:
DecimalTime [seconds] = OldTime [seconds] * 100.000 / 86.400
We have 100 x 100 seconds in an hour, and 10 hours per day, so:
DecimalTime [hours] = OldTime [seconds] * 10 / 86.400
There are multiple Arduino libraries available on the web to access the DS1302. I looked around and selected Makuna’s Rtc library, since it is well documented, contains clear examples and can be installed directly into the Arduino IDE using the Library Manager.
To control the I2C display I used the LiquidCrystal_I2C library by John Rickman, although I was in doubt; LiquidCrystal_PCF8574 by Mathertel would have been applicable too.